Installing Open edX on Ubuntu with Tutor
This tutorial guides you through installing Open edX using the Docker-based distribution, Tutor, whose containerized architecture further contributes to Open edX’s scalability. This step-by-step tutorial aims to fill in some of the gaps in the official documentation that may trip up less-experienced LMS self-hosters.
The particular installation described in this article is for Ubuntu Server 22.04.

Self-host Open edX for Scalability
The Open edX Learning Management System (LMS) is the most popular open source LMS for hosting MOOCs (Massive Open Online Courses). Open edX may not be inherently more scalable than alternative LMS platforms like Moodle from a technical perspective, but it is in practice. First, its mission has always been to reach as many students as possible. Its parent platform, edX (now owned by 2U) was always intended for MOOC content since its inception in 2012. Moodle, on the other hand, has was created before the boom in popularity of MOOCs in 2013, and has always targeted a more general audience. Alternatively, many other platforms specifically target institutions (like Canvas) or are spin-offs of platforms used at various universities. Accordingly, if you are targeting students who have prior experience studying in edX courses, Open edX is a logical option because of the familiar user experience.

Open edX lets you scale your course fast...
Also, the Open edX interface encourages the creation of scalable courses. For example, it has streamlined student and educator interfaces and less customizability than Moodle, but it cuts out some of the former’s modular complexity. Another area where Open edX disintuishes itself for MOOC hosting is in its granular analytics data and data reporting tools.
Open edX via "Tutor"
There are several installation methods for Open edX, but the official Open edX documentation recommends installing via Tutor. In fact, the other production-ready release version will soon be depricated.
Tutor is the “official Docker-based Open edX distribution”. Tutor’s containerized architecture and configuration commands support both horizontal vertical and scalability, as Docker-compose can spin-up more containers to accommodate server demand.
Another benefit of Tutor is that it automates many aspects of an otherwise-complex setup procedure. In the past, Open edX has had a notoriously difficult installation. In particular, Tutor eases the process of installing custom plugins, themes, or additional functionalities.
Why this Tutorial?
This tutorial aims to make Open edX installation more accessible to educators who are not experienced web developers. Specifically, while the official documentation touts a "one-click" install, this is not the case if you figure in that Tutor requires other software to be installed on your server. In our experience, if your server meets all of the requirements, you have Docker and Docker Compose installed and correctly configured, and you follow the official instructions on the Tutor website perfectly, then installation is pretty straightforward. However, in our experience, if any of this is not the case, this installation can be a headache, espcially for those of us who are not as expereinced with LMS installation. All in all, Tutor is a great tool, but we hope that this tutorial can serve as an additional instructional guide for those who need a bit more support along the way.

Some folks struggle with the Open edX installation
Prerequisites
- A server running a recent version of Ubuntu Server (we are using 22.04 in this tutorial).
- Command line access to your server, either physically or via SSH (Secure Shell).
- Knowledge of the command line interface / terminal, as in this tutorial, you'll see such code presented in codeblocks like this:
code code
                                         code
                                         code code code
                                         code code
Installation Instructions
1. DNS Setup
First, you will need to obtain a domain name from which you will be able to access Tutor. We purchased ours on NameCheap.com. If you're not familiar with how to do this, we also have a step-by-step tutorial on how to register a domain name.
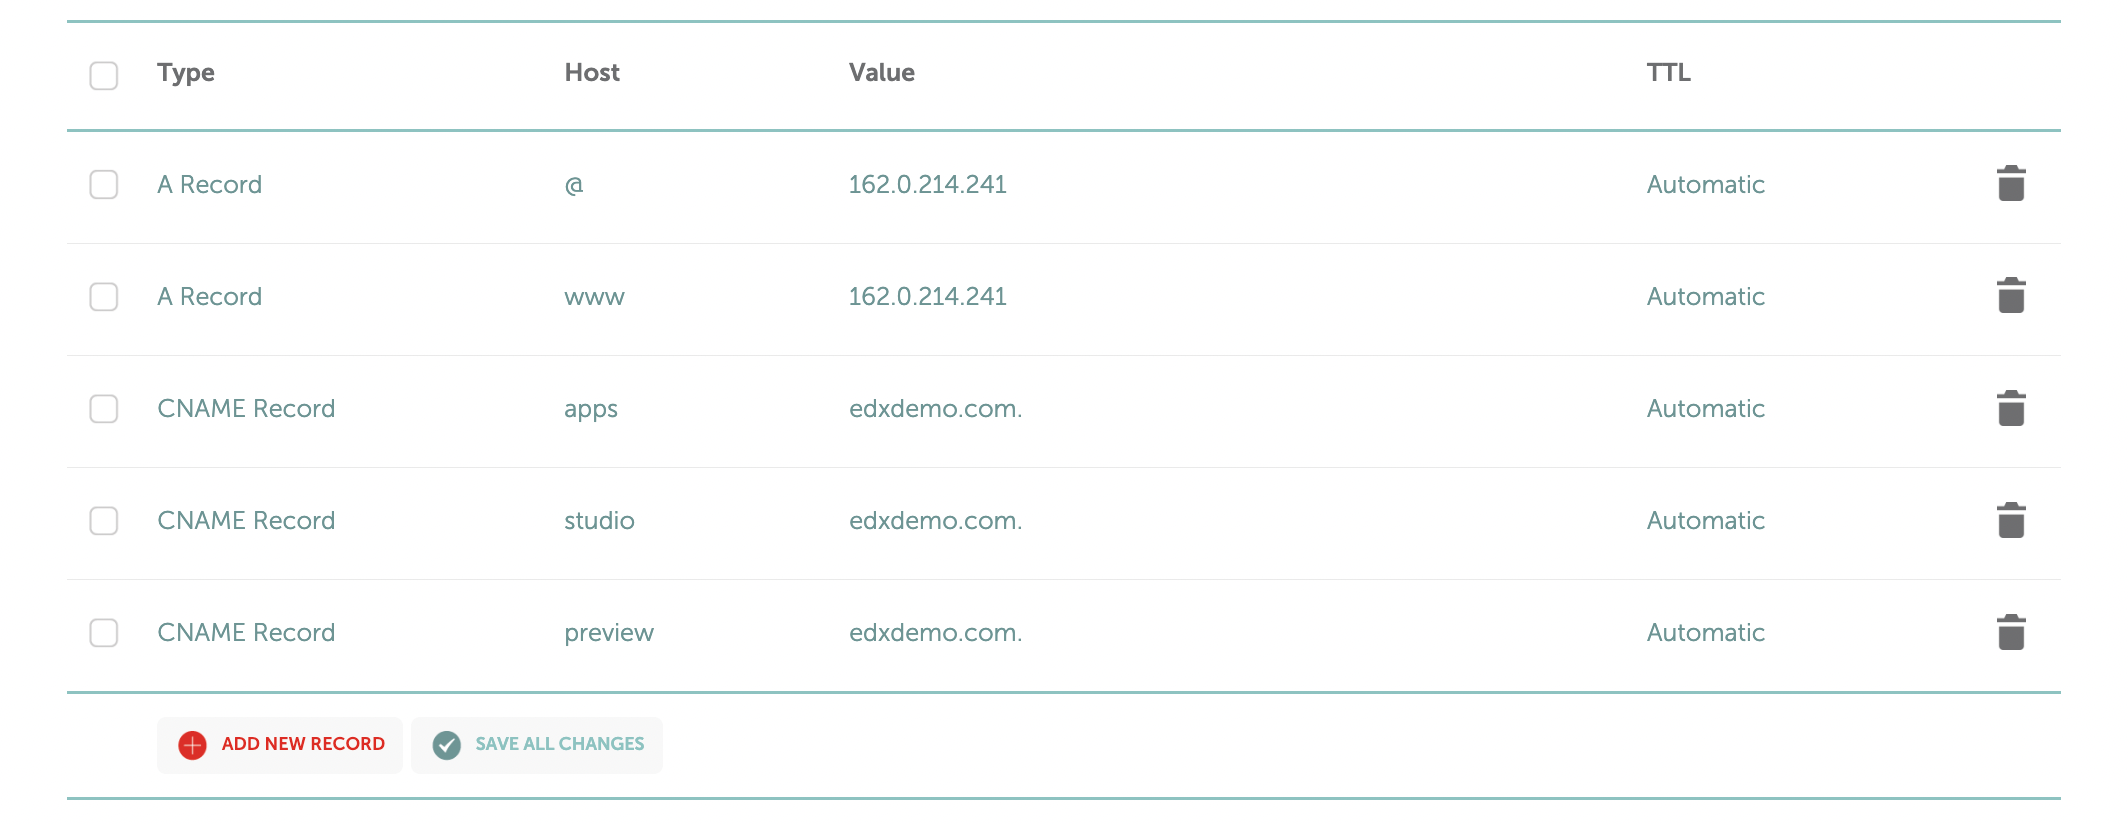
Next, you will need to create A records for your domain name, as well as CNAME records for the "apps", "preview", and "studio" subdomains:

Setting Up DNS A records and CNAME Records
You may have to wait a few minutes for the A records and CNAME records to propagate.
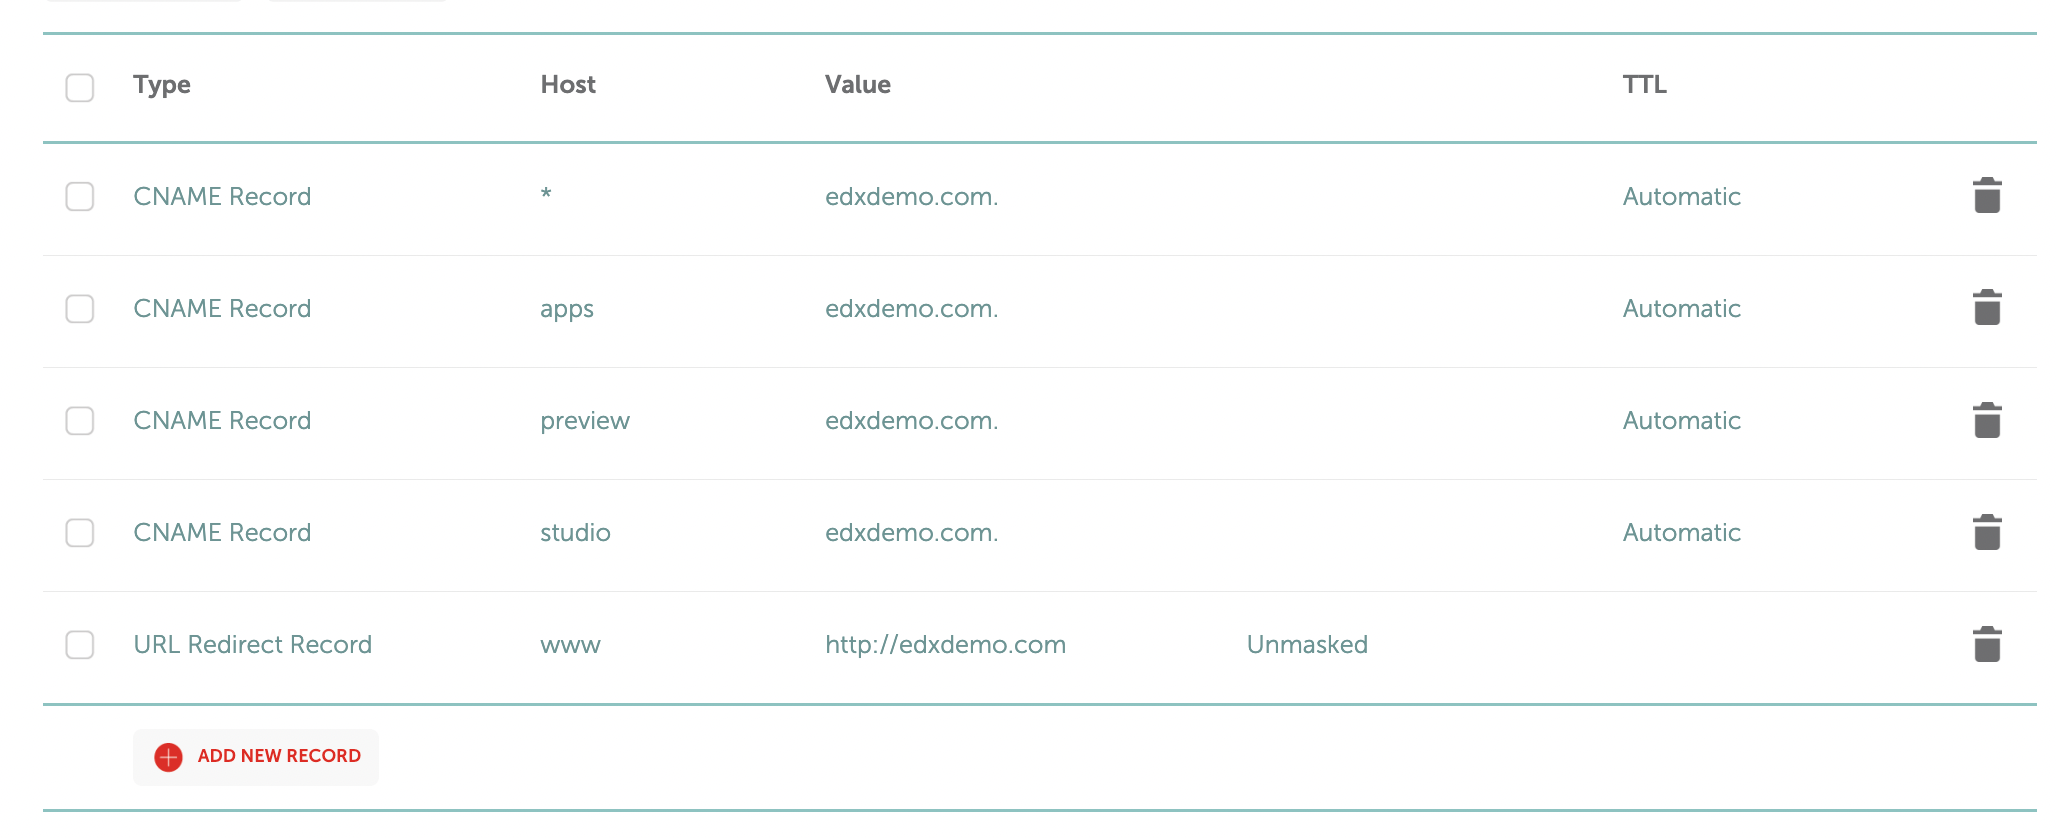
You will also want to include a URL redirect for the "www" address because it won't resolve if you set the site name in the Tutor config setup to the non-www address (i.e., edxdemo.com rather than www.edxdemo.com)

Setting Up a DNS "URL Redirect" Record
2. Installing Docker and Docker Compose
First, go into the terminal of your server.
We will install Docker (i.e., Docker Engine) according to the instructions on the Docker website, but we will fill in some of the details that are absent in the official instructions, which are pretty minimal:
First, we update our list of packages from the APT repository that need to be upgraded:
sudo apt-get update
Install the "ca-certificates" and "curl" packages using apt-get:
sudo apt-get install ca-certificates curl
The "ca-certificates" package is a "deb package that contains certificates provided by the Certificate Authorities."
Next, we will create a directory called "keyrings." This is the directory where we will download the GPG key for the Docker apt repository. Here is a good explanation of GPG, but in short it's a cryptographic system that, in this case, verifies the authenticity of the packages in the repository:
sudo install -m 0755 -d /etc/apt/keyrings
A few other notes about this line:
-
installis like thecp"mkdir" command, but allows for more concise setting of options. It is also similar to the cp command. -
The
-m 0755option sets the permissions of the installed directories to 755 (read/execute for all; write only for owner). -
The
-doption creates all necessary parent directories for "keyrings", in this case /etc and /apt, if they don't already exist.
Next, we download the "public key" (docker.asc) from Docker and store it in our keyrings directory. This is for future authentication of packages that we download from the Docker repository. You can read more about GPG keys for authenticating repositories if you like.
sudo curl -fsSL https://download.docker.com/linux/ubuntu/gpg -o /etc/apt/keyrings/docker.asc
A few other notes about this line:
-
The
"-f"option asks that the file transfer fail silently if there is a problem downloading the key (rather than give us an error). -
The
"-sS"options is for "silent" mode, specifying that progress bars and errors not be shown, unless there is an error (explanation here). - The "-L" option is explained later on in this tutorial.
Next, read access to the public key is granted to all users on your system:
sudo chmod a+r /etc/apt/keyrings/docker.asc
Add the repository to apt sources list:
echo \
                    "deb [arch=$(dpkg --print-architecture) signed-by=/etc/apt/keyrings/docker.asc] https://download.docker.com/linux/ubuntu \
                    $(. /etc/os-release && echo "$VERSION_CODENAME") stable" | \
                    sudo tee /etc/apt/sources.list.d/docker.list > /dev/null
Notes:
-
The
$(dpkg --print-architecture)substitutes the specific architecture of your machine into the command. -
The piping operator,
|, followed byteepasses the expression between quotes to the "docker.list" file. -
> /dev/nulldisregards any stdout or stderr from the output.
Now, we can update the packages in our packages list.
sudo apt-get update
Finally, we can install Docker and related packages:
sudo apt-get install docker-ce docker-ce-cli containerd.io docker-buildx-plugin docker-compose-plugin
Notably, we are installing the Docker Compose plugin. Docker Compose coordinates all of the individual Dockerized programs that make up Tutor: Caddy, Django, etc.) You can install the "plug-in" version for Docker Engine, rather than the "standalone" version.
If you're interested in understanding Docker and Docker Compose in a bit more depth, you can consult our tutorial about Moodle installation with Docker.
3. Installing Tutor
We went ahead and installed Tutor from the binary:
sudo curl -L "https://github.com/overhangio/tutor/releases/download/v17.0.1/tutor-$(uname -s)_$(uname -m)" -o /usr/local/bin/tutor
curl is a tool that you can use to transfer data to and from a server.
It stands for "Client for URL."
We can then make sure that only the user has write permissions to the /usr/local/bin/tutor folder:
sudo chmod 0755 /usr/local/bin/tutor
You can also install Tutor with Python:
You should already have Python installed if you are using a recent version of Ubuntu Server. You can confirm that it is installed by checking its version:
python3 -V
You can use Python's pip package manager for the install:
pip install "tutor[full]"
You may see an error come up about the installation location not being on the "PATH":
If so, you can add $PATH to /home/[username]/.bashrc
export PATH=~/.local/bin:$PATH

                    export PATH=/home/[username]/.local/bin:$PATH
4. Setting User Permissions
You want to add a non-root user to the server:
adduser [username]
...and grant root privileges:
sudo usermod -a -G sudo [username]
You will need to add your non-root user to the Docker group and reboot the system for the changes to take effect:
sudo usermod -a -G docker $USER

                    reboot
Now, for example, when looking at the groups present on your server with the getent command, you should see:
docker:x:999:[username]If not, you might see this error (as these folks did!):
Docker: Got permission denied while trying to connect to the Docker daemon socket at unix:///var/run/docker.sock
Don't worry about messing around with any other configuration files like "/etc/hosts/", even though this is mentioned in some of the Tutor discussion forums.
5. Configure TCP/UPD Ports
We need to make sure that your web server machine is configured to be listening to and receiving incoming HTTP and HTTPS requests:
netstat -lntu
Netstat "prints information about the Linux networking subsystem."
The -lntu specifies four different options, or flags:
- "-l" (or "--listening"): This returns only ports where a service is listening for incoming requests. If you leave off this option, these ports will not appear in the results.
- "-n" (or "--numeric"): This returns only port numbers, rather than trying to figure out the name of the service running on that port. Omitting this option will return "http" and "https", rather than "80" and "443".
- "-t" (or "--tcp"): This returns only port addresses from the TCP family connections. TCP connections are typically used for communications where reliability and transmission completeness is prioritized over speed (e.g., sending emails, file transfers, web browsing).
- "-u" (or "--udp"): This returns only port addresses from the UDP family connections. UDP connections are typically used for communications where speeed is prioritized over reliability and transmission completeness (e.g., video streaming, online gaming).
By the way, you can add these flags in any order (e.g., -tunl, -ulnt, etc.)
If either port 80 (HTTP) or 443 (HTTPS) are blocked by the firewall, you can open those ports with:
sudo ufw allow 80

                    sudo ufw allow 443
(These ports should be open by default on Ubuntu, however.)
6. Launch Tutor
To launch Tutor, you can use this command:
tutor local launch
When asked for your website in the config prompts, leave off the "www"
Tutor will tell you that your website is available at your domain name. If everything worked, it should be live.
Your EdX instance should run at the URL, but not at the IP address (weird, right?)
Once you're up and running, create an admin account. I've created a user named "admin" with my email address:
tutor local do createuser --staff --superuser admin admin@lmstutorials.com
Conclusion
Congratulations on launching your new Open edX instance. Much fruitful educating lies ahead!
Here are some next steps once you're up and running:
- You can familiarize yourself with the basic Tutor commands.
- You can import the demo course:
tutor local do import democourse

A bright path lies ahead for this online educator.
If you have any trouble, remember you can just always try again. Just reinstall the Ubuntu operating system, and start over!


