Generating Test Student and Course Data with the Moodle Development Kit
Tired of time-consuming development tasks like manually creating fake students, courses, and forums for Moodle testing? The Moodle Development Kit can help you automate these tasks. This tutorial provides all the necessary background and walks you through installation and setup on Ubuntu Linux.

TABLE OF CONTENTS
I. Introduction: MDK Automates Boring Testing Tasks
II. Prerequisites: What You'll Need To Get Started
III. MDK Installation Instructions
- Install Required Software
- Create Moodle Database
- Install Moodle Development Kit
- Initialize Moodle Development Kit
- Moodle Instance Creation
- Generating a Test Course
- Creating 100 Fake Students
- Enrolling a Variety of Users
V. Scripts: "Copy & Paste" QuickStart Commands
VI. Conclusion: Stepping Back & Next Steps
VII. References
Introduction
"I will always choose a lazy person to do a difficult job because a lazy person will find an easy way to do it."- Bill Gates
Manually Generating Test Data is a Huge Pain
In a previous tutorial, we discuss the advantages of using Docker images to eliminate the need to manually reinstall required software (Apache, PHP, database server like MySQL) every time you want to test Moodle on a fresh machine. However, once you’ve set up a testing instance, Moodle developers often face many more repetitive tasks when testing inside a given instance. For example, you may find yourself testing out new plugins (e.g., modules, blocks, themes, course formats) or 3rd party tools or testing existing plugins to ensure compatibility with a Moodle or PHP version or to make sure the UI looks good. This often requires logging in and experiencing different courses as users who hold various administrative roles (e.g., students, teachers, managers) and creating or viewing content like assignments submissions or forum posts/replies. As you likely already are aware, manually adding these user and content test elements can be a pretty big pain.
MDK Automates Boring Testing Tasks
The “Moodle Development Kit” MDK is a collection of 27 commands and 15 scripts that are really useful tool for automating these kinds of data and procedures. For example, there are commands to instantly create courses, to enroll dozens of students fake students, teachers, and managers in your course.
What This Tutorial Offers
While there is a set of instructions for the Moodle Development Kit on the official GitHub page, they are not as detailed as they could be, as they are more geared towards seasoned Moodle developers/administrators. Therefore, this tutorial aims to provide a more comprehensive resource. In particular, this tutorial guides you through the installation of the Moodle Development Kit and running basic MDK commands and included scripts. It also includes two scripts which you can use to automate the MDK setup process even further: one for installing MDK and another for populating a fake course with test data.
Okay, let's get started!
Prerequisites: What You Need To Get Started
It will help to have the following prerequisites before using this tutorial:
-
A server running a Linux distribution. We use Ubuntu, and some commands may be different if you are using a different distribution.
-
"Root" or "sudo" user access to the server.
-
Basic understanding of the command line interface (CLI). For example, you might see blocks of code formatted like this:
code code code code
                                    code code
We've got a tutorial on this!
-
Optional: A domain name pointing to your server’s IP address (not necessary if you are fine just remembering an IP address for testing)
MDK Installation Instructions
Here are steps for how to install MDK:
1. Install Required Software
First, you’ll need to install Apache, PHP, PHP Extensions, and MySQL first. The development kit doesn’t download them automatically. Make sure that the PHP version is appropriate for the version of Moodle that you are installing.


Moodle Required Software
# Install Apache
                                            sudo apt-get update
                                            sudo apt install -y apache2

                                            # Install PHP and PHP modules, as well as configure php.ini files.

                                            sudo add-apt-repository -y ppa:ondrej/php

                                            sudo apt install -y php8.0 php8.0-{cli,curl,gd,xml,iconv,mbstring,mysqli,intl,soap,xml,xmlrpc,zip}


                                            # Change "max_input_vars" in php.ini

                                            sudo sed -in 's/;max_input_vars = 1000/max_input_vars = 5000/' /etc/php/8.0/apache2/php.ini

                                            sudo sed -in 's/;max_input_vars = 1000/max_input_vars = 5000/' /etc/php/8.0/cli/php.ini

                                            sudo service apache2 restart
Notes:
sudo apt-get updateupdates the apt package library.- The
-yoption on theinstallcommand automatically answers "yes" to all installation questions without prompting you. - "ondrej" is a widely-trusted personal package archive (PPA) for Ubuntu PHP packages.
- Everything in brackets between
php8.0-{}are PHP extensions required for Moodle. -
The
sedcommand lets you change values in a configuration file from the command line. The-ioption makes that the change reflects in the file itself rather than just display on the command line. The-noption disables automatic printing ofsedto the command line.
STEP 2: Create Moodle Database in MySQL (or other database server)
The next step is to install a database on the server. This is necessary because Moodle needs a place to store user data. For this tutorial, we’ll use a MySQL database-server.
First, install MySQL server:
sudo apt install -y mysql-serverNext, create a database called “moodle:”
sudo mysql -proot -e "CREATE DATABASE moodle DEFAULT CHARACTER SET utf8mb4 COLLATE utf8mb4_unicode_ci";
Notes:
DEFAULT CHARACTER SET utf8mb4allows you to store symbols like emojis in the database.COLLATE utf8mb4_unicode_cimakes content in the database case-insensitive.
Next, we'll assign a database password to the "root" user so that we can access the database with this password:
sudo mysql -e "ALTER USER 'root'@'localhost' IDENTIFIED WITH mysql_native_password BY 'root';"
Notes:
- The
-eoption is short for “— execute” and allows you to run mysql commands from the command line that would normally be input into the mysql interface. - The
ALTER USERSQL command specifies that password of “root” should be set as “root”.
3. Install Moodle Development Kit
Now it's time to install the Moodle Development Kit package. To install MDK on Debian-based systems (for example, we are using Ubuntu), you'll need to install the "pip" package manager. Pip is the go-to package repository for Python packages, in case you didn't know.
sudo apt-get install python3-pip libmysqlclient-dev libpq-dev python2-dev unixodbc-dev pkg-config build-essential
All of these packages, except pkg-config and build-essential, are recommend in the official install documentation in Frédéric Massart’s GitHub (he's a former senior Moodle Developer), and presumably the guy who spearheaded the development of MDK.
Installing pkg-config and build-essential are necessary if you get a “pkg-config: not found” error (there's a StackOverflow thread about this).
Then, we'll install the moodle-sdk python package from pip:
pip install moodle-sdk --user4. Initialize Moodle Development Kit
The final step in the setup process is to initialize MDK. This entails creating the main MDK folder, loading the configuration, and initializing parameters according to answers provided by the user through a series of prompts (see comments in the init.py script).
First, the installation assumes that ~/.local/bin is in your executable path.
We’ll set that to be the case, just in case it’s not:
if [ -d "$HOME/.local/bin" ] ; then PATH="$HOME/.local/bin:$PATH"; fiThen, we’ll initialize MDK:
mdk initYou will be prompted for the document root. On Ubuntu, this will be /var/www/html (not the default of /www).
By default, MDK will install instances to your home directory. A symlink will be created from your DocumentRoot to the install location. (From here). This means that you don’t actually need to copy anything into the /var/www/html directory.
Now, a “moodles” folder should be installed in your home directory. All of the config info can be found or edited in: ~/.moodle-sdk/config.json
However, you will need to set your user as the owner of the webroot, for the sake of access permissions:
sudo chown [your_username] /var/www/htmlFinally, you will need to switch back to your user, as recommended in the official MDK instructions:

sudo su `whoami`Congratulations! You should be able to able to log in to your Moodle instance as the "admin" user with a password of "test". Now, you're ready to take advantage of some of the cool automation features of MDK...
Example Use Cases for MDK
It's helpful to see MDK in action.
Let's look at some examples of use cases where the run command is used to execute various preloaded scripts.
Here's a look at the scripts that come included:

Scripts included with MDK
Example #1: Moodle Instance Creation
Here are steps for how to install an instance of Moodle 3.11 with a "development" configuration:
mdk create -v 311 -e mysqli -r dev users -n moodle_311You can change the last argument to whatever name you like.
Example #2: Generating a Test Course
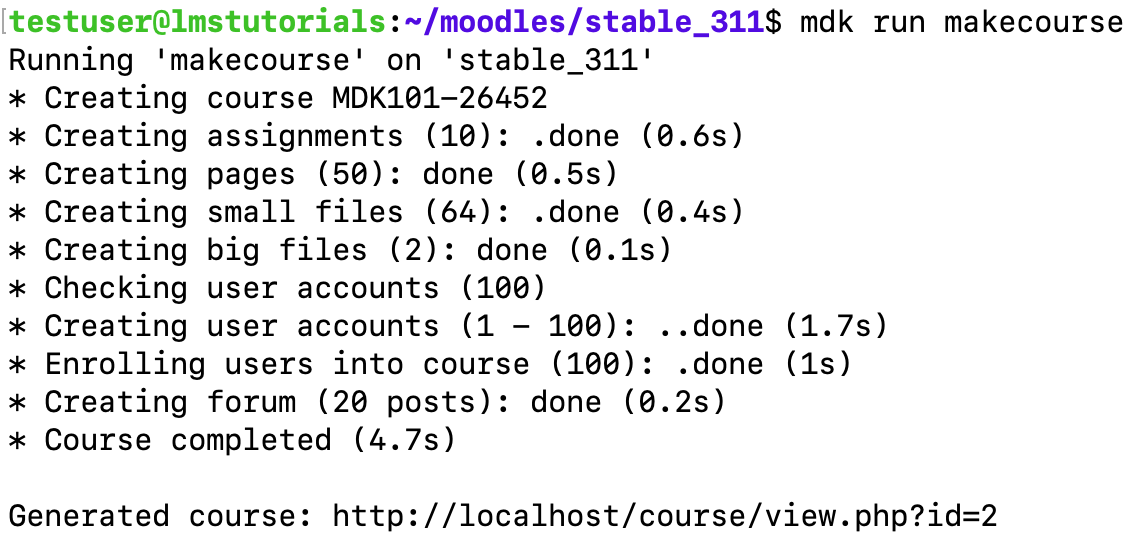
We can use the run with the makecourse argument to create a test course that come pre-populated with unit sections, assignment and forum activities, file and page resources, and 100 test students.
mdk run makecourse [name of moodle instance]
Use the 'run makecourse' command to quickly generate a test course
Example #3: Adding a Variety of Users
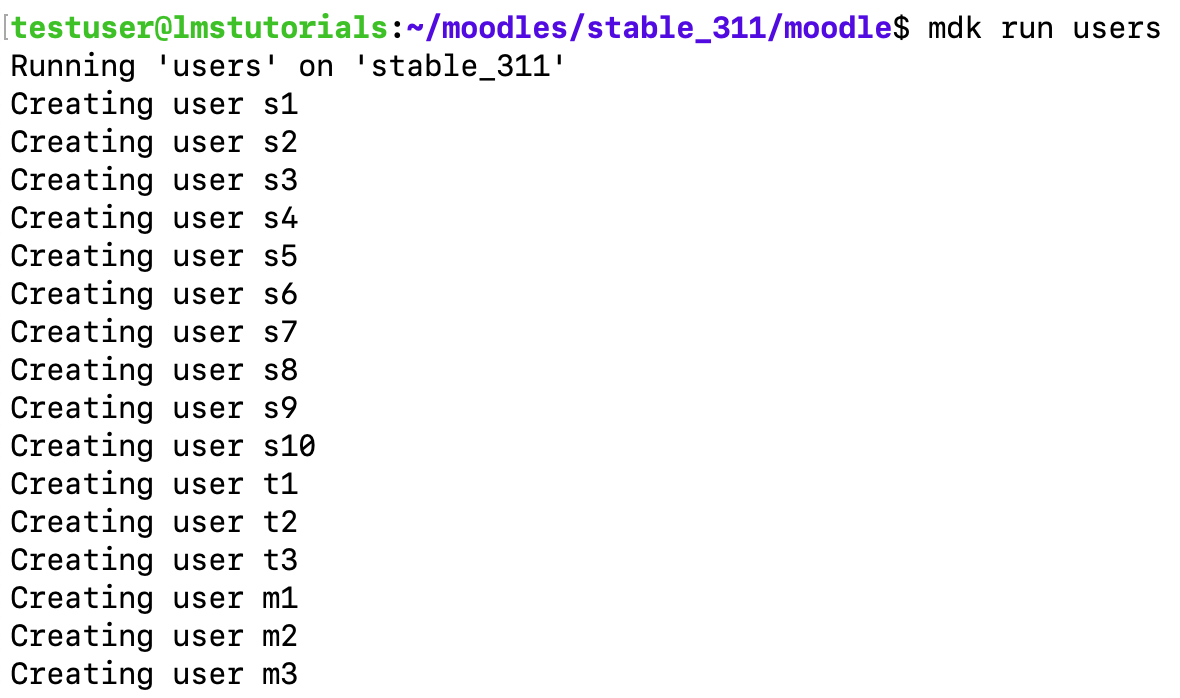
We can use the run users command to generate 10 students, 3 teachers, and 3 managers in one action.
We don't need to have a course ready in order to run this command, the users are simply in the database and unassigned to a course.
mdk run users
Use the 'run enrol' command to quickly generate users with student (s), teacher (t), and manager (m) roles
Example #4: Creating and Adding test users to all courses
Similar to the users script, we can run the enrol script to, not only create users, but automatically enroll them in each course page on the site.
mdk run enrolScripts
MDK Installation
# Install Apache

                            sudo apt-get update

                            sudo apt install -y apache2


                            # Install PHP and PHP modules, as well as configure php.ini files.

                            sudo add-apt-repository -y ppa:ondrej/php

                            sudo apt install -y php8.0 php8.0-{cli,curl,gd,xml,iconv,mbstring,mysqli,intl,soap,xml,xmlrpc,zip}


                            # Change "max_input_vars" in php.ini

                            sudo sed -in 's/;max_input_vars = 1000/max_input_vars = 5000/' /etc/php/8.0/apache2/php.ini

                            sudo sed -in 's/;max_input_vars = 1000/max_input_vars = 5000/' /etc/php/8.0/cli/php.ini

                            sudo service apache2 restart


                            # Install and configure MySQL and create Moodle database

                            sudo apt install -y mysql-server

                            sudo mysql -proot -e "CREATE DATABASE moodle DEFAULT CHARACTER SET utf8mb4 COLLATE utf8mb4_unicode_ci";

                            sudo mysql -e "ALTER USER 'root'@'localhost' IDENTIFIED WITH mysql_native_password BY 'root';"

                            sudo mysql -proot -e "GRANT ALL PRIVILEGES ON *.* TO 'root'@'localhost'";

                            sudo service mysql restart


                            # Install Python and then MDK through PIP

                            sudo apt-get install -y python3-pip libmysqlclient-dev libpq-dev python2-dev unixodbc-dev pkg-config build-essential

                            pip install moodle-sdk --user


                            # In order to be able to write to the web root

                            sudo chown testuser /var/www/html


                            # If "$HOME/.local/bin" directory exists, then add it to the beginning of your PATH

                            if [ -d "$HOME/.local/bin" ] ; then PATH="$HOME/.local/bin:$PATH"; fi


                            # Launch MDK

                            mdk init # set dir to /var/www/html

                            # This is recommended in the MDK install instructions.

                            sudo su `whoami`
Install Moodle 3.11 and Setup a Fake Course
# Install Moodle


                                    # $PATH has probably been reset, so set it again:

                                    if [ -d "$HOME/.local/bin" ] ; then PATH="$HOME/.local/bin:$PATH"; fi

                                    # sudo mysql -uroot ALTER USER 'root'@'localhost' IDENTIFIED WITH mysql_native_password BY 'root';


                                    # No install option: we'll do that next. The "install" option redirects to localhost, which isn't great if we're using a local network.

                                    mdk create -v 311 -e mysqli -r dev users -n moodle_311


                                    sudo chmod 755 /home/testuser/ # to avoid 403 errors


                                    # Create Moodle config.php with our custom options (including a non-localhost wwwroot)

                                    name=moodle_311

                                    install_path=~/moodles/"$name"/moodle/admin/cli/install.php

                                    wwwroot=http://[your_local_IP_here]/"$name"

                                    dataroot=/home/$USER/moodles/"$name"/moodledata

                                    sudo php "$install_path" --non-interactive --lang=en --wwwroot="$wwwroot" --dataroot="$dataroot" --dbname=moodle --dbuser=root --dbpass=root --fullname="$name" --shortname=Test --adminpass=test --agree-license


                                    # Permissions of config.php are too restrictive

                                    sudo chmod 755 ~/moodles/$name/moodle/config.php


                                    # Make fake course!

                                    mdk run makecourse $name
Conclusion
Hopefully, this tutorial has helped you appreciate the potential of the Moodle Development Kit for alleviating some of the boring, redundant tasks that come up in Moodle development. We encourage you to dig and an explore the other commands and scripts that come included with the package.
One drawback of MDK is that it won't install Apache, PHP and databases for you. This isn't a problem if you already have the databases and PHP versions installed on your machine and you are just creating lots of different instances. However, if this becomes an issue for you, consider integrating MDK into a Docker Compose app (link) if you anticipate testing on various required software. For example, you could include MDK in one Docker image, and various versions of PHP and different databases in other images.

Consider integrating MDK into a Docker Compose app for maximum efficiency!
That's all, folks!
