Authenticating Your LMS with SSL Certification
Get your LMS secured with an HTTPS padlock icon, and avoid students getting scary warnings about the authenticity of your site. This tutorial covers generating and uploading CSR keys and installing SSL certificates so that visitors to your course site can rest easy!

Why Autheneticate your LMS?
"Why Authenticate?"
Using SSL certification on your website offers several key benefits. Firstly, it enhances security by encrypting the data transmitted between your website and its visitors, making it extremely difficult for hackers to intercept and decipher sensitive information like passwords or credit card details. Secondly, SSL certification improves trust and credibility among your website visitors, as they can see the padlock symbol and/or "https://" in the URL, indicating that their connection is secure. This can lead to increased user confidence, higher levels of engagement, and ultimately more conversions. Additionally, SSL certification can positively impact your search engine rankings, as major search engines like Google prioritize secure websites in their search results. Overall, implementing SSL certification is a vital step in safeguarding both your website and the privacy of your visitors.
In other words, when you visit a website, would you like to see the nice paclock icon in the search bar or a scary browser warning that the page that you are visiting is not secure?
You should also consider authenticating your site if you are using virtual hosting on your server (i.e., hosting several different sites from one server). I have run into a problem where Google directs traffic to HTTPS pages unless HTTP is specifically specified. Most visitors to your page will not do this! If an HTTPS option is not available, users can be redirected to other sites served from your server that are secured instead. Not only will visitors be directed to the wrong site, they will often be presented first with the warning page telling them that the web address they have entered may be attempting to impersonate another. This is a great way to scare away potential vistors to your site!
"How Does SSL Work?"
SSL (Secure Sockets Layer) certification works like a digital passport for websites, ensuring secure communication between your browser and the website you're visiting. When you visit a site with SSL, it creates an encrypted connection, scrambling data exchanged between your device and the site's server. This encryption keeps sensitive information, like passwords or credit card numbers, safe from hackers who might try to intercept it. SSL certificates are issued by trusted organizations called Certificate Authorities, which verify the identity of the website owner, ensuring you can trust the site with your information.
"Why This Tutorial?"
While overall, SSL certification enhances security and trust, navigating the process of obtaining and configuring it can be intricate and demanding. Once obtained, configuring SSL on the server requires technical expertise, and misconfigurations can lead to compatibility issues or security vulnerabilities. In particular, generating and managing SSL certificates involves tasks such as creating certificate signing requests (CSRs), obtaining certificates from trusted Certificate Authorities, which can be confusing for LMS administrators who lack expertise. Also, in my experience, I found much of the documentation/instructions for installing SSL certificates to be confusing the first time I attempted to certify a site. Also, I though that many steps were glossed over and assumed to be understood. Therefore, I'm hoping that this more comprehensive tutorial is a bit more helpful for newcomers.
Prerequisites
- A website!
- Root or "sudo" access on the server hosting your website
SSL Installation Instructions
1. Purchase an SSL certificate
I find it easiest to puchase SSL certificates through my domain provider, which happens to be NameCheap. Accordingly, these directions will descirbe the process for purchaseing on the NameCheap website.
Select the "Security" option in the NameCheap navigation bar:

Select the "Security" option in the NameCheap navigation bar.
And select the option for "SSL Certificates:"
The "Positive SSL" option is adequate for many basic use cases. If your site handles sensitive user info, you may want to consider a more secure (but more expensive) option.

The "Positive SSL" option is adequate for many basic use cases.
You should be able to see that the certificate has been purchased, but that it is not yet active:

2. Activate your certificate on NameCheap
After purchasing the certificate, click the "Manage" button:

Click the "Manage" button.
After clicking the "Manage" button, you should see an option to "Activate" the certificate. However, you won't be able to activate the certificate yet.

You won't be able to activate the certificate yet!
3. Log into your server
Before you are able to activate the SSL certicate, you will need to create a "key" on your server. Do to so, you will need to log into your server directly or remotely using SSH.
4. Make a folder for your SSL keys
If you don't have one already, you'll want to make a directory to store your SSL keys:
mkdir /etc/ssl # Make an ssl directory if it doesn't exist already
            cd /etc/ssl    # Go into the directory
5. Generate a public and a private key
The public key is a Certificate Signing Request (CSR), that will be submitted to NameCheap.
You can find instructions for this in this NameCheap documentation.
openssl req -new -newkey rsa:2048 -nodes -keyout server.key -out server.csr
Name the "server.key" and "server.csr" the actual name of your server though. If you don't, the next step won't work (NameCheap will tell you your domain is misspelled). For example, I ran this command:
sudo openssl req -new -newkey rsa:2048 -nodes -keyout lmstutorials.com.key -out lmstutorials.com.csr
When you run this command, you'll be asked a bunch of questions. You don't have to answer all of them. For your organization name, you can just put your web domain if you like. You will also be prompted for your "server FQDN or YOUR name." FQDN stand for your "fully qualified domain name." You can just use the domain name of your site (e.g., lmstutorials.com)
You can find your csr like this:
sudo cat lmstutorials.com.csr

The CSR public key is one half of a cryptographic pair, (along with the corresponding private key). It is used to establish secure SSL connections between a server and clients.
6. Upload the CSR to NameCheap for Review
Now you are ready to activate the certificate! Go back to NameCheap and click the "Activate" button. You should be prompted to paste your certificate request. This is the contents of the .csr file that your created on your server.
Make sure to include the header and footer message: i.e.,
"-----BEGIN CERTIFICATE REQUEST-----" and "-----END CERTIFICATE REQUEST-----"
You don't need to worry about taking all of the white space from line breaks out. A simple copy paste is sufficient. If you get an error from Namecheap saying it is "unable to parse" your file, repeat the previous step and try making sure that your domain name is entered correctly. All of the information about your server that you entered is encoded in the certiciate request.
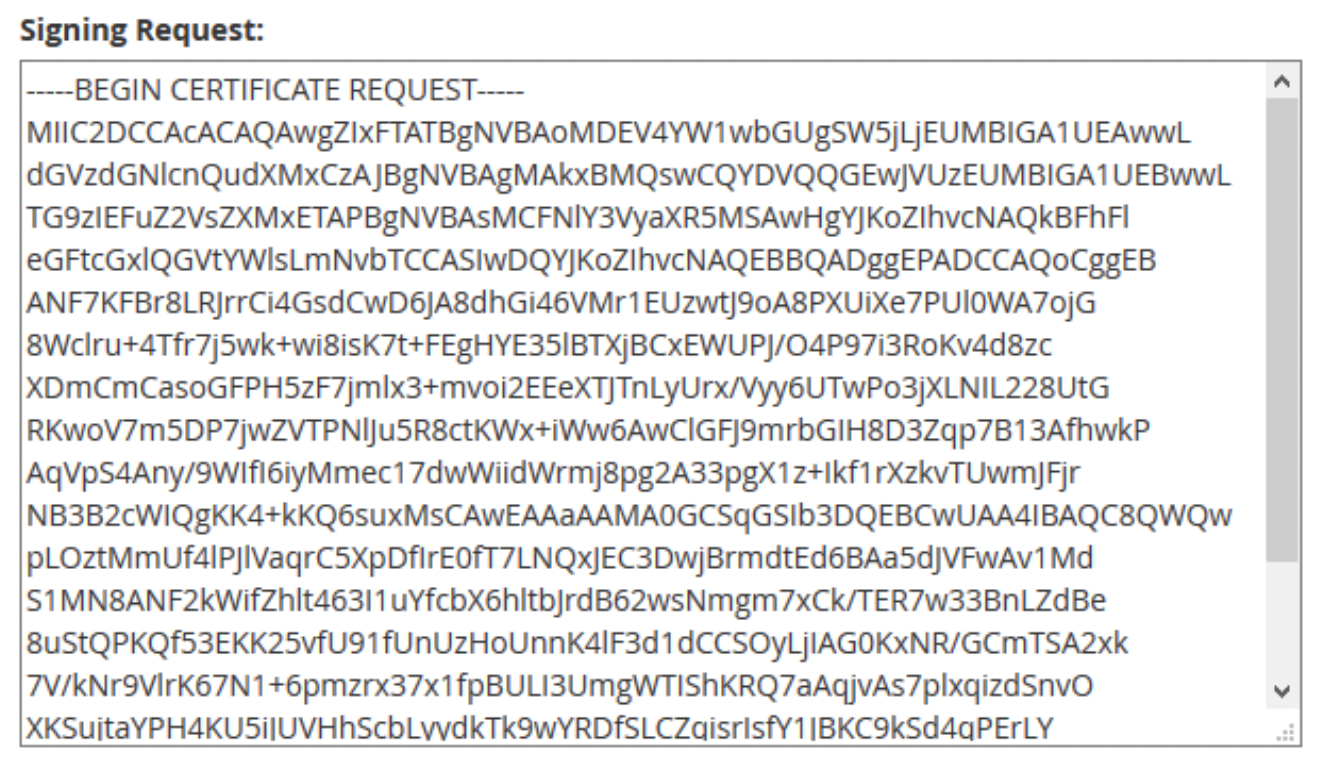
You will paste your certificate request into a text field
7. Provide Evidence that You are the Site Owner
You will need to select a method of confirming your ownership of the domain in question.
We typically use the "CNAME" validation approach.
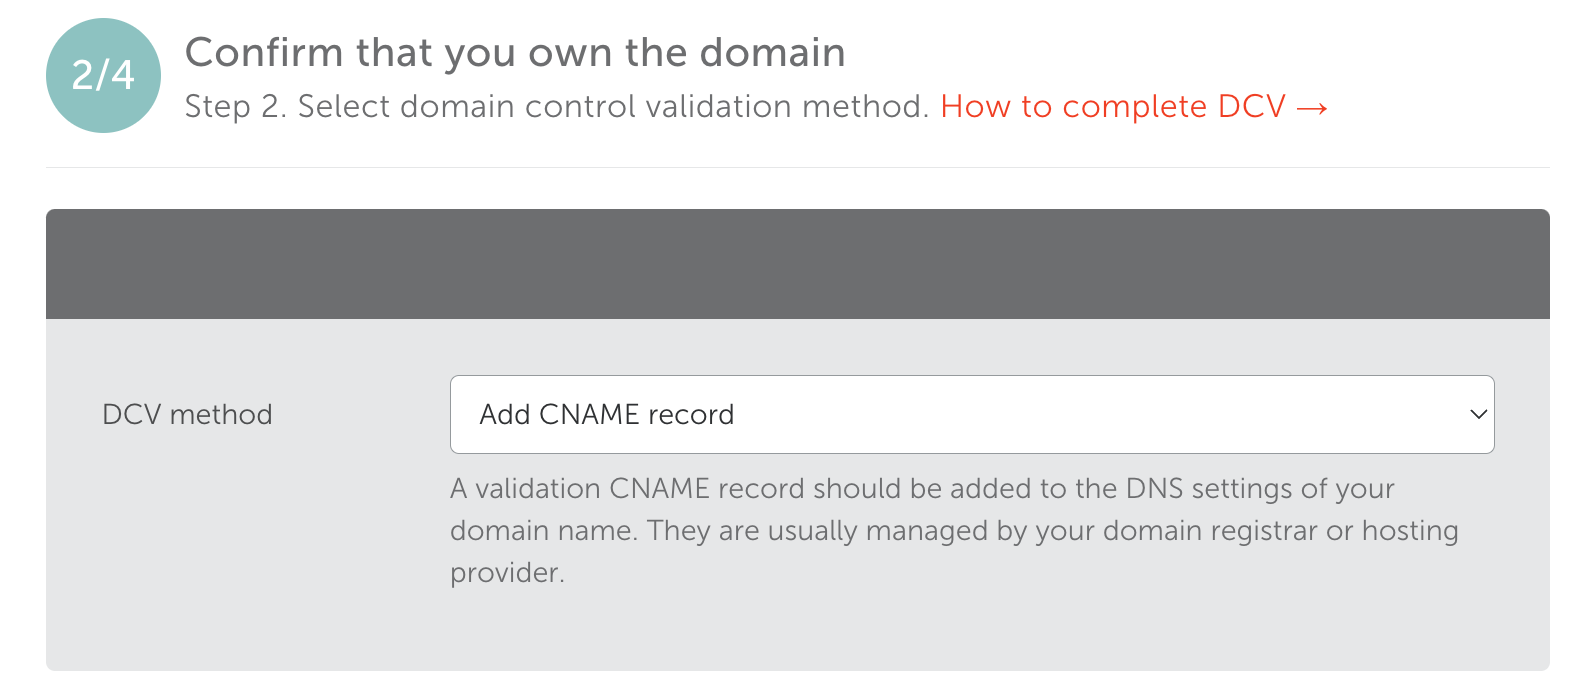
Click the "Manage" button.
You should click the link, "Get a CNAME record from this page":
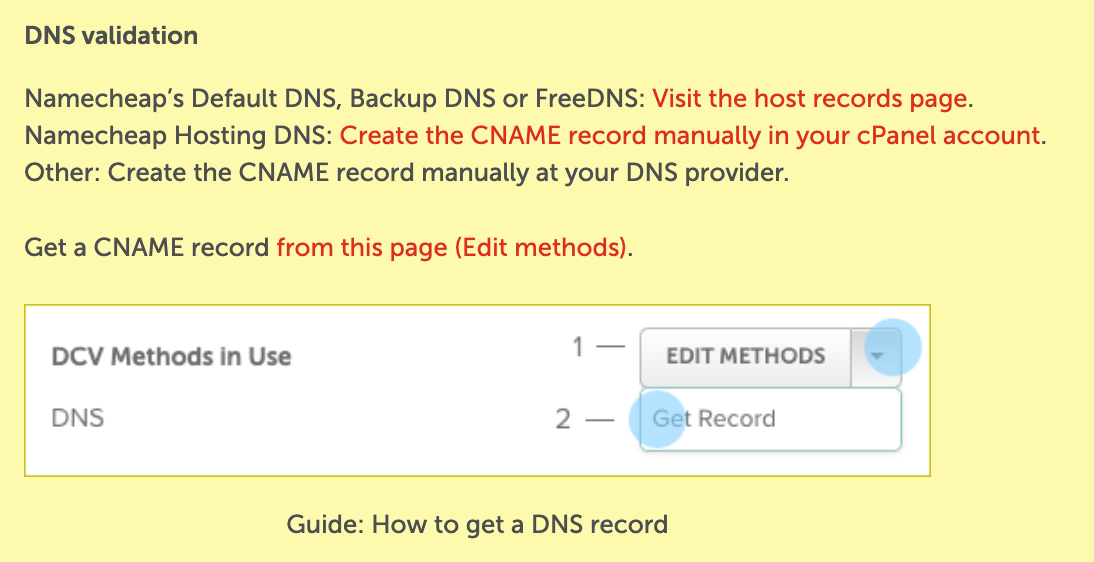
Click the "Get Record" option to obtain a CNAME record to use for validation:

Click "Get Record"
NameCheap will provide you with a "Host" and a "Value" to add into a CNANE record. It's not stated in all of the NameCheap documentation, but you should leave your domain name OFF of the host value. Otherwise, the CNAME record will not propagate. You can leave the domain name at the end of the "Value" value. Leave the TTL at "automatic".
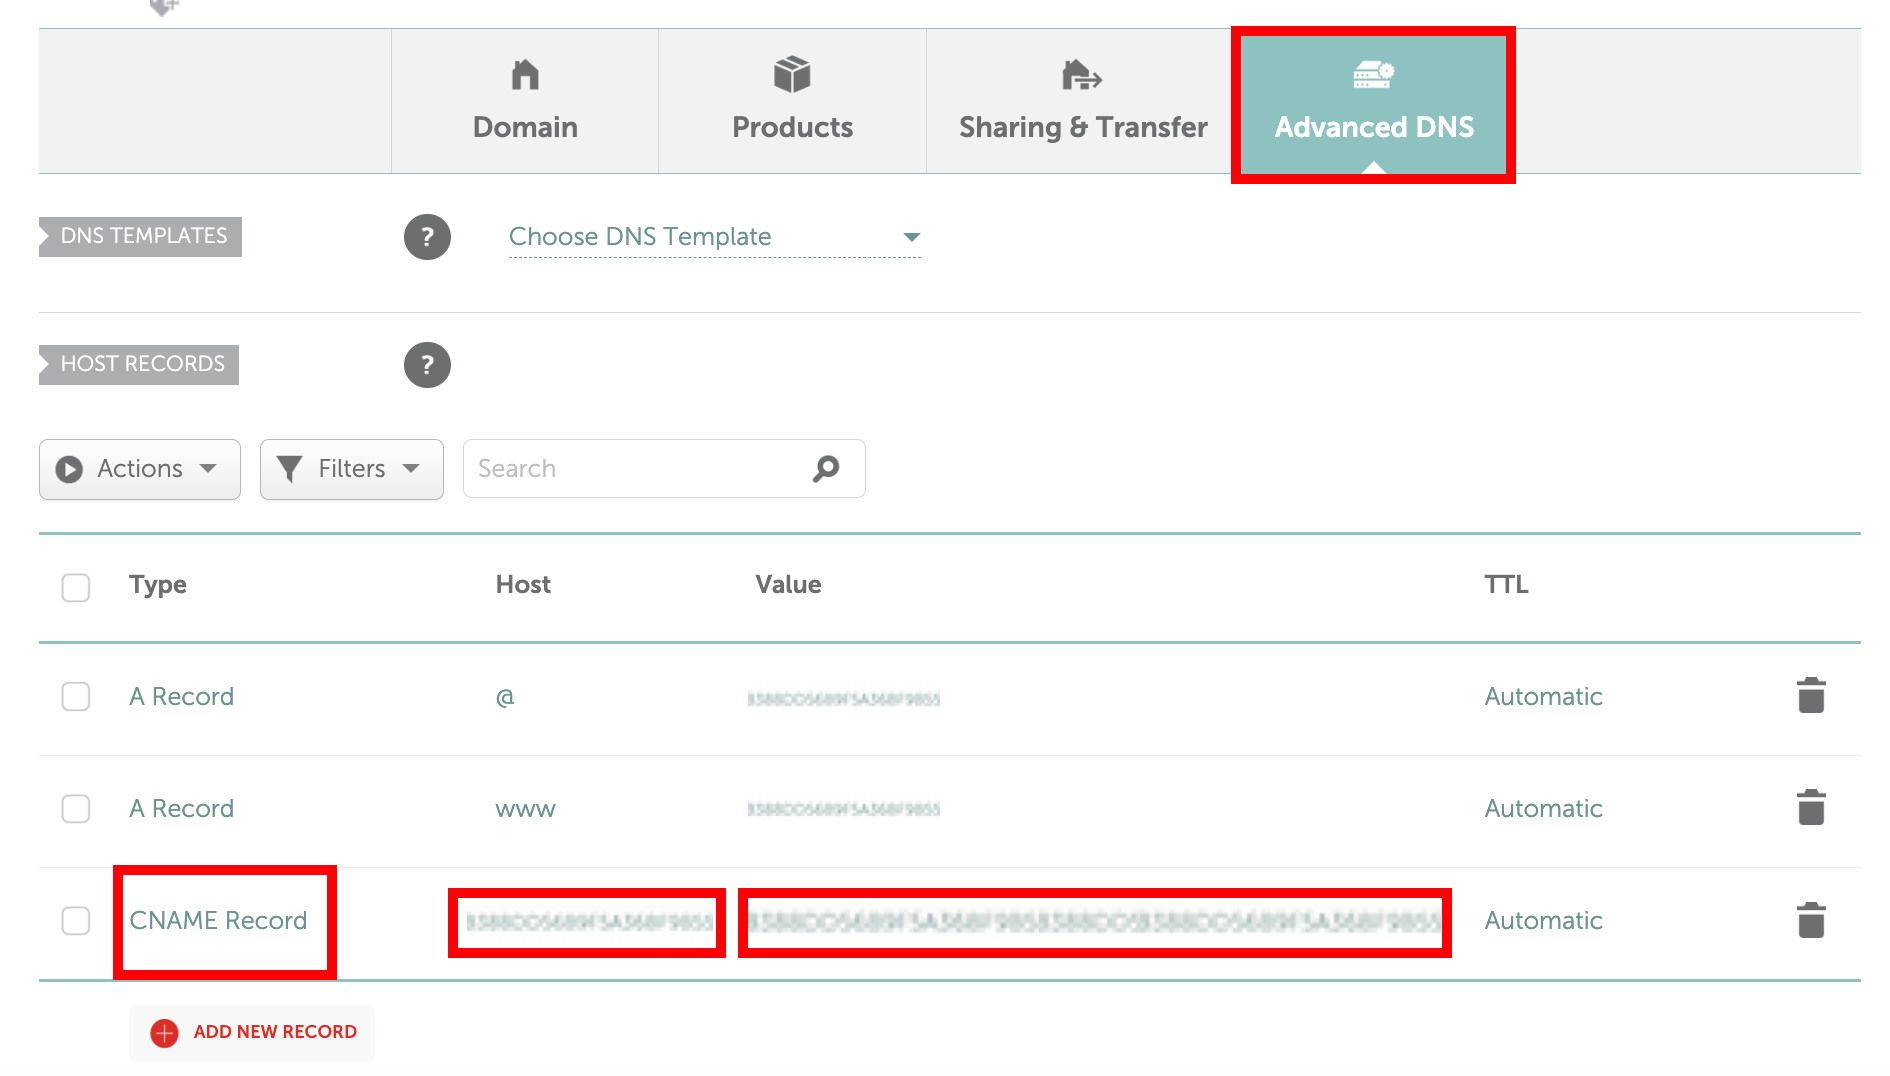
Enter the "Host" and "Value" supplied by NameCheap
Check back to "SSL certificates" tab to see if the SSL has been successfully issued. You may need to wait a while for the record to propagate. This will usually take around 30 minutes, but can take up to 8 hours. If its says "active," you are all set! If you're still waiting after 8 hours, you can contact NameCheap support.
8. Install the SSL Certificate
To install the SSL after the certificate has been issued, first check your email. Your .crt and .ca files will be attached!

You will receive your certificate via email
9. Upload these Files to the SSL Directory on the Server
You can use the secure copy utility to upload them to your server:
sudo scp -r /Users/[username]/Desktop/lmstutorials.com.crt [username]@[server_address]:/etc/ssl/lmstutorials
If you are getting a "permission denied" error with scp, you may need to scp into the remote home directory, then move it into the ssl folder.
10. Enable SSL Support for Apache
Next, you will need to enable the ssl module in the Apache server software:
sudo a2enmod ssl
              sudo service apache2 restart
11. Allow site-specific Apache Config File Edits
Allow site-specific config file edits by allowing overrides in the main Apache config file (/etc/apache2/apache2.conf):
<Directory /var/www/>
              Options Indexes FollowSymLinks
              AllowOverride All
              Require all granted
            </Directory /var/www/>
12. Add Key and Certificate Paths
Add the relevant key and certificate paths to the bottom of the specific config file that corresponds to the site:
<VirtualHost *:443>
              ServerName (DOMAIN NAME OF THE WEBSITE)
              DocumentRoot (ROOT FOLDER OF THE WEBSITE)

              SSLEngine on
              SSLCertificateFile (Certificate PATH)
              SSLCertificateKeyFile (Private key PATH)
              SSLCertificateChainFile (CA Bundle PATH)
              </VirtualHost>
Here's an easy way to check where the configuration file for the website is:
apachectl -S
You can check the file syntax with:
apachectl -t
13. Restart Server
If the syntax of your config file is "OK," then you can restart the server:
sudo service apache2 restart
Again, you can use:
apachectl -S
......to see if the SSL config is working properly.
14. Redirect HTTP Traffic to HTTPS
Finally, you will want to redirect traffic to the old HTTP address to the new HTTPS address (for example, if folks have bookmarked the old page).
Here is a StackOverflow discussion regarding how to redirect HTTP traffic on port 80 to HTTPS on port 443. A recommendation that we follow is:
RewriteCond %{SERVER_PORT} 80
              RewriteRule ^/?(.*)$ https://www.statsturtle.com/$1 [R,L]
The /? in the regular expression makes sure that the resulting URI does not have a double slash in it.
If the redirect is adding two slashes to the URL, check out this StackExchange discussion.
Conclusion
Congratulations! You have now enabled SSL authentication for your site! You can remove the CNAME record now for your domain if you like.
Additional Resources
- "How Do I Activate a SSL Certificate?" (NameCheap)
- Check out this NameCheap instructional video.
- NameCheap's SSL "checker" tool
- Another piece of NameCheap documentation regarding SSL certificate installation.


